Friday, May 3, 2013

Horizontal Top Bar Hives

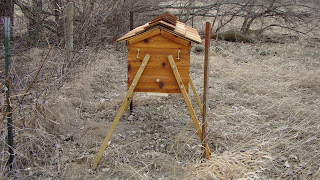
Bees seemed like a good first step (after the worms) to add to my livestock variety and count.  After not so much deliberation (but enough to make a knowledgeable decision) I decided to follow the ways of a UK bee expert, P.J. Chandler.  He describes his method as "barefoot beekeeping" or minimalist (not hippie) beekeeping.  After reading The Barefoot Beekeeper twice, I started attempting to design and build the horizontal top bar hive (HTBH).  This hive has many advantages that I liked;  the most notable being:
  • No heavy lifting
  • Mouse proof
  • Easy to control swarming and multiple colonies (if deciding to be more involved)
  • Excellent winter insulation
  • Mesh floor in spring/summer for mite control
Luckily, P.J. wrote a supplement to The Barefoot Beekeeper on making HTBHs.  It was a good reference, but my Dad and I soon discovered that it could have been written a little better.  We got a little confused from time to time.

Materials

The materials are quite simple, and the cost was pretty reasonable as well.  For the wood, I chose red cedar.  Cedar is supposed to be a nice and hardy wood that won't rot as fast as the others.  The man at the store also told us that you want your cedar boards to not have white streaks in them.  The white streaks were apparently weaker wood than the red streaks.  Any of the materials used were high quality materials (if not the highest I could find) and all natural.  The rule of thumb when building a beehive - if you won't put it on your skin, don't put it on your hive.

Overall materials cost:
  • Wood (non-treated cedar) - $212.29
  • Outer coating (replacing paint to keep it natural)
    • Raw Linseed Oil - $28.99
    • Beeswax - $6.99
    • Note:  the amount I bought could have easily covered 5 hives
  • Nails/Screws/Bolts - $20.22
  • Wire Mesh:  ~$5.00
  • Roofing materials (shingles and underlayer):  FREE!  Thanks to my brother's friend!
Total cost of the high quality materials ends up being $273.49.  This made me feel better knowing that places were selling hives at a much higher cost for much lower quality of materials.

Construction

I'm not going to go into the details of the construction, mainly due to me just repeating what P.J. Chandler wrote in his book.  I am going to force support for him and urge you to purchase his $1.99 ebook in order to get the exact measurements and such.  In this post, I'm just going to highlight a few things that my Dad and I finally figured out after re-reading the book several times or after we started construction.

The construction is really completed in two different stages, the main body of the hive and then the roof.  The roof must be done after the main body in order to ensure that it fits appropriately.  The last thing that needs to be done is getting the topbars in place.

Left to right:  boards cut for the ends, sides, roof, floor, and legs
We discovered the importance of follower boards very quickly.  Our first mistake was not taking enough time to get the follower boards in better and more consistent measurements with each other.  These boards and their angles determine the angles of the hive.  They will also be the barriers for the bees, so making sure they are snug throughout the hive no matter where they are is important not only to keep the bees warm, but to keep them in the compartment that you want them in!  P.J. puts a formula in his book.  If you are planning on deviating from any of his measurements, be sure to make the follower boards according to the formula!
Follower  boards
The topbars are what the bees are actually going to be making the honey on.  They basically just sit loosely between the roof and the main body of the hive.  We could potentially have issues with raccoons and the way the topbars are just sitting there, but I guess we will see!  None of my research uncovered others having this issue with raccoons.  So I guess we'll see!
Hive without the topbars in place and with the corks to plug the holes

Hive with topbars in place

Side view of the hive with hooks (to keep out the raccoons)

Mesh floor.  We reinforced it with additional boards on the bottom so raccoons wouldn't peel it off.
In addition to P.J. Chandler's design, we did a little more raccoon proofing (since the UK doesn't have raccoon issues).  And once we cleared up the confusion we had with his design regarding 1 - the importance of the follower boards and 2 - how the topbars were set on the hive loosely, we did pretty well!  I will keep you posted on how the hives fair.  We are already planning on fixing the errors on the follower boards once we have a break in the bees, and hopefully that will be the only modification for us amateur beehive makers! But really only time and the bees will tell.

Monday, March 11, 2013

Pizza Farms

I'm always looking at ways farms get people to know them and know their produce and products.  I think this is a really excellent way to get people out to farms.  The concept is to have one night a week be a "Pizza Night" where people can bring anything in (like blankets, alcohol, etc.) and enjoy a freshly made pizza from ingredients grown right where they are chilling.  The farm that I found doing this is the AtoZ Produce and Bakery out of Wisconsin.  I'm not quite so sure on the price.  The reviews on Yelp were saying that one pizza was priced at $26.  That's pretty expensive!  But the apparently these people have a good idea!  And it doesn't seem QUITE so expensive to make happen!

Tuesday, February 12, 2013

Meat...Again

Apparently Ashton Kutcher has started making interesting "culture" videos with his new Thrash Lab concept.  I happened across one that I absolutely love about butchers (of course!)  Why do I love videos about cutting up meat?

Earlier, I wrote about my new (but not so new) rules on meat.  In the last few weeks I've had a few friends approach me about their thoughts.  One was feeling bad about eating meat due to the numerous food documentaries being made and watched.  The other is attempting to go vegan.  The only advice that I had for the documentary-watcher was, "You don't like it!  Do something about it!  Change your ways!"  Obviously my advice is NOT to give up meat.  I think animals are a very important part of our food system.  And they should be eaten in order to keep balance!  But we do need to respect the life that we take.  One of my favorite examples of this is in the Last of Mohicans.  I couldn't find a clip of the scene, so I've embedded the whole movie (which I love).  From 3:22 to about 4:26 you can see the homage that the Mohicans pay to the deer after they shoot it.  I think this is definitely something that a lot of us forget about when we sit down to eat.


The hopeful vegan and I had a completely different conversation.  The attempter is thinking that even if animals are being raised sustainably, they are still contributing to the messed-up food system.  I completely disagreed with this, and told the vegetarian as such.  After my obvious disagreement, the conversation stopped, so I didn't receive any good arguments for the reasoning.  I think the vegetarian is trying to turn me completely vegetarian.  I'm pretty sure that is never going to happen!

Thursday, January 31, 2013

Worm Farming

Last month my goal was to start worm composting (vermiculture).  I've been pretty excited about it.  A few weeks back I got a few worms from the urban farm that I've been going to permaculture courses at the last few months.  It's supposed to be pretty easy once you get started, but the first two weeks have been a little difficult.  The first week I had them I went on a snowboarding vacation and came home to several dried up worms on my floor.  (They were trying to escape!)  Since then I've been trying to monitor their food and moisture in the bin, but I did a check today and I could only find a few worms.  I'm a little nervous I will kill them all!  So I upped their food supply and tried to put more moisture on them.  Colorado air is pretty dry, so I'm assuming that's partly what I'm doing wrong.

So hopefully next month I'll have a positive update about my worm bin!  I'm hoping to have a good supply so as to start giving them to some of my friends.  So far my bin design is just two 18 gallon rubbermaid bins (one with holes for air).  One bin is where the worms live while the other is to catch any of the water that might "run off".  The bin containing the worms has about 5 inches of shredded newspaper as bedding.  Handfuls of dirt are intermittently scattered to provide grit for the worms' digestion.  Then I just bury the food under the shredded paper and place soaked cardboard on the top.  (The cardboard actually dries out almost immediately, but we'll see if I can keep it as wet as possible.)  Before today I've been misting the paper, but I think I need to start taking more drastic measures with the moisture.  I haven't harvested any castings yet, but I plan to do that either tomorrow or this weekend.

So I am still not a successful worm farmer, but I'm guessing the moisture and humidity level is that which is "killing" me right now.  I'll be providing an update on my worms' status as soon as I have something to update!  It's kind of exciting that I'm finally doing something with my craft that warrants an update.  I'm finally not just reading!